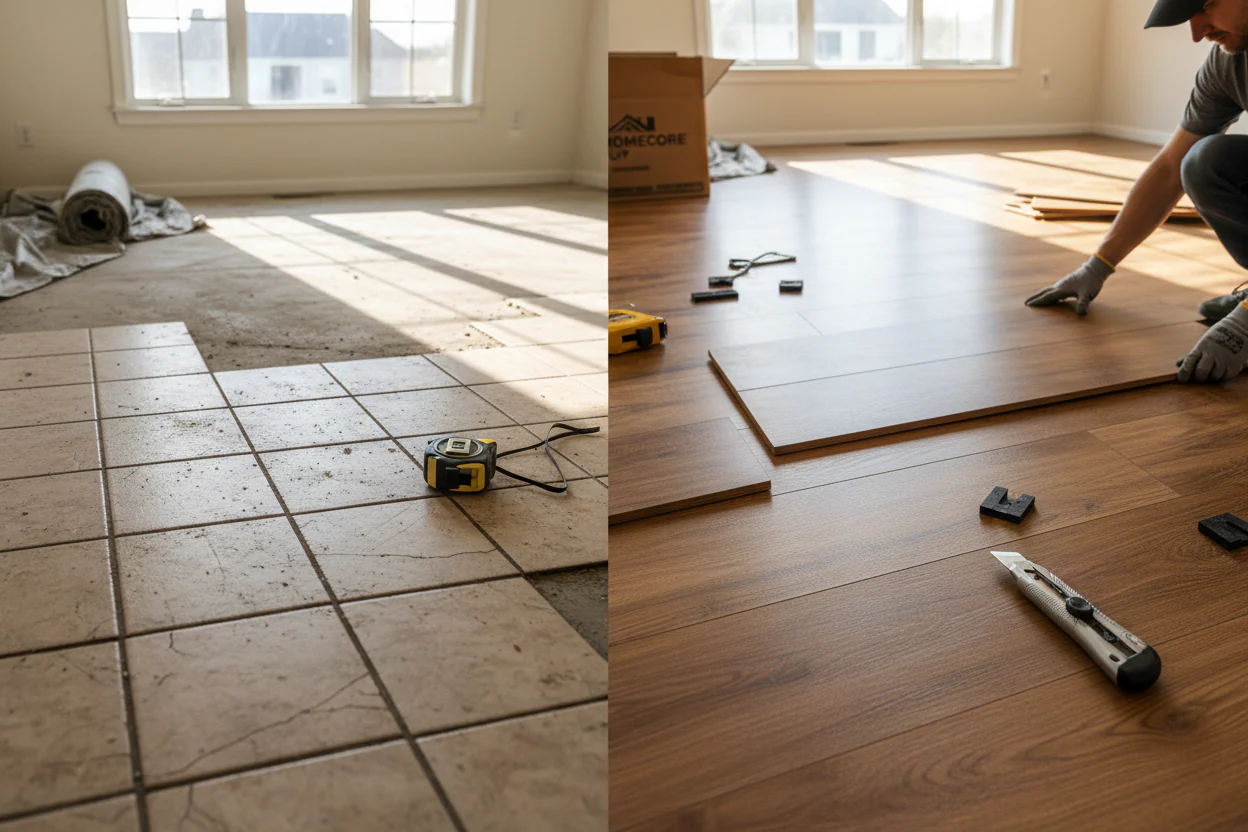
Old tile has a way of making a room feel stuck in another decade, even when the rest of the home has moved on. That is why vinyl plank flooring appeals to so many U.S. homeowners who want a cleaner look without turning the house into a demolition zone. The promise sounds almost too neat: cover the dated ceramic, avoid dust, skip hauling broken tile, and still end up with a floor that feels fresh underfoot.
That plan can work. It can also punish you if you ignore what is happening under the planks. Tile is not automatically a good base because it is hard. It must be flat, stable, dry, and quiet before it earns the right to stay. Good flooring decisions start before the first box is opened, which is why practical home improvement resources like renovation planning guidance matter when homeowners are comparing time, money, and risk.
When Vinyl Plank Flooring Can Go Over Existing Tile
Leaving tile in place is not a shortcut. It is a judgment call. The floor beneath your feet has to prove it can support a new surface without creating ridges, dips, hollow spots, or height problems that show up after the job is finished.
How to Tell Whether the Tile Is Stable Enough
A solid tile floor feels boring in the best way. It does not click, shift, drum, or flex when you walk across it. If you tap different areas with a rubber mallet and hear hollow patches, that tile may already be loose from the mortar bed.
Loose tile is not a cosmetic issue. It becomes movement under the new floor, and movement is what ruins locking joints. A kitchen in Ohio with three cracked tiles near the refrigerator may look like a small repair, but if those cracks come from subfloor flex, covering them only hides the warning sign.
The counterintuitive part is that ugly tile can be a better candidate than pretty tile. A stained but bonded 1990s ceramic floor may accept new planks well, while a newer glossy floor with loose corners can fail fast. Appearance tells you less than sound and stability.
Why Flatness Matters More Than the Tile Itself
Luxury vinyl does not forgive waves the way carpet does. A floor can look flat from standing height and still have enough unevenness to strain the plank joints. Long straightedges, not eyesight, tell the truth.
Most plank makers set flatness limits in their own installation instructions, so the product guide should be read before any prep begins. The Tile Council of North America is also a useful place to understand tile systems and why a hard surface can still have hidden weakness.
A common problem appears in older homes where tile grout lines are wide and deep. Those lines can telegraph through thinner vinyl over time, especially in sunny rooms where warmth softens the material slightly. The floor does not fail all at once. It starts with faint shadows, then edges, then a surface that never looks smooth again.
Preparing the Surface Before Install Over Tile
The smartest installation is won before the first plank snaps together. Preparation feels slow because it gives you nothing pretty to photograph. Still, this stage decides whether the finished floor looks professional or like a weekend project that got tired by Sunday afternoon.
Cleaning, Deglossing, and Checking for Hidden Contaminants
Tile floors collect more than visible dirt. Old wax, cooking grease, soap film, pet residue, and grout sealers can sit on the surface for years. A floating floor may not bond to the tile, but dirt still matters because grit underlayment can grind, squeak, and create tiny pressure points.
A proper wash uses a residue-free cleaner and enough rinse water to remove film. Bathroom tile deserves extra attention around toilets, tubs, and vanities because moisture and cleaning products often build up there. A floor that smells clean is not always clean enough for installation.
Some glossy tile also needs light abrasion if a patching compound will be used. That does not mean sanding the whole room into dust. It means giving fillers and primers the surface they need to hold where grout joints, chips, or low spots must be corrected.
Filling Tile Grout Lines Without Creating New Problems
Wide tile grout lines are the trap most homeowners underestimate. Thin planks can bridge those channels at first, then slowly settle into them as daily foot traffic presses the material down. Sunlight, rolling chairs, and heavy kitchen islands make that settling worse.
A floor patch or embossing leveler can smooth the grid before installation. The goal is not to bury the tile under a thick new slab. The goal is to reduce surface variation so the planks rest on a consistent plane.
Patience matters here. Patch material must dry according to the label, not according to your weekend schedule. In a humid Florida laundry room, a rushed patch can hold moisture beneath the new floor. That trapped moisture may not rot vinyl, but it can affect adhesives, underlayment, baseboards, and nearby wood trim.
Managing Height, Doors, and Floor Height Transition
A new floor changes the room in more ways than color. It raises the surface, tightens clearances, affects appliances, and changes how one room meets the next. This is where many neat-looking projects turn into annoying daily problems.
Door Clearance and Appliance Fit Are Not Small Details
Interior doors often need trimming when planks go over tile. The same issue appears at closet doors, pantry doors, and exterior thresholds. A quarter inch may sound minor until a bathroom door scrapes the floor every morning.
Appliances need the same respect. Dishwashers are the biggest offender in U.S. kitchens because they may become trapped under the counter after the new floor height rises. If the old tile already runs under the dishwasher, adding planks may leave too little room to remove the appliance later.
A simple test saves grief. Measure clearances before buying materials, then add the plank thickness and any approved underlayment. The surprising truth is that the floor can look perfect and still be a bad installation if it locks your dishwasher in place.
Making Transitions Look Intentional
Room-to-room edges expose the quality of the job. A poor floor height transition feels awkward underfoot, catches socks, and makes the new floor look like it was laid over a problem instead of designed as part of the home.
Transition strips should match the actual height difference, not the color alone. Reducers, T-moldings, and end caps each solve a different edge condition. Choosing the wrong one because it looks close on the shelf creates a trip point at the doorway.
Older ranch homes often have tile in kitchens and hardwood in nearby halls. Covering the kitchen tile may bring the two surfaces closer in height, which sounds good. Yet if the new plank rises above the hardwood, the visual balance flips. That is why dry-fitting transitions before the last row is cut saves both money and pride.
Installation Choices That Protect the Finished Floor
The planks may be the part you see, but the installation method is what you live with. A good layout handles expansion, light, traffic, and room shape before the first row is locked. A poor layout makes even expensive flooring feel off.
Floating Floor Prep and Expansion Space
Most homeowners choose floating planks for this kind of project because they avoid glue and make the work cleaner. That does not mean the floor floats without rules. It needs room to expand and contract around walls, cabinets, pipes, and fixed objects.
Floating floor prep includes removing base shoe, planning expansion gaps, checking manufacturer limits for room size, and deciding where transitions are required. Large open layouts may need breaks even when a homeowner wants one continuous surface.
Heavy built-ins also need caution. Planks should not be pinned under kitchen cabinets or permanent islands unless the manufacturer allows it. The floor needs to move as a single surface. Trap it in the wrong spots, and the pressure may show up as buckling across the room.
Layout Direction, Light, and Daily Wear
Plank direction changes how a room feels. Running planks with the longest wall often makes the space feel calmer. Running them toward a major window can reduce the visibility of seams. Neither rule wins every time.
Daily wear should guide the layout too. Hallways, kitchen paths, and entries take the hardest traffic. A narrow row along a busy wall will look cheap and may be less stable, so planning the first and last row widths matters more than many beginners expect.
Staggering seams is another place where patience shows. Random does not mean careless. A pattern that repeats every few rows catches the eye, while short end pieces near doorways weaken the look. The best plank floors feel relaxed because someone planned them carefully.
Conclusion
Covering tile can be the right move when the old floor is bonded, flat, dry, and not creating height trouble at doors or appliances. It saves demolition mess, cuts waste, and gives homeowners a faster path to a room that feels current. Still, the floor you do not remove has to be treated like part of the new system, not like a surface you are trying to forget.
The best vinyl plank flooring projects start with a blunt inspection. Tap the tile, check the plane, measure clearances, fill the low spots, and read the product instructions before the first cut. That slower beginning is what makes the finished room feel solid six months later.
Take the time to test the floor before you cover it, because the cheapest mistake is the one you catch while the tile is still visible.
Frequently Asked Questions
Can luxury vinyl plank go directly over ceramic tile?
Yes, it can go directly over ceramic tile when the tile is firmly bonded, flat, clean, and dry. Loose tiles, deep grout joints, cracks, and uneven areas must be repaired first. The product instructions should always control the final decision.
Do tile grout lines show through vinyl plank floors?
Deep or wide grout lines can show through thinner vinyl planks over time. This is more common in warm rooms, sunny areas, and spaces with heavy traffic. Filling the joints with a suitable patching compound helps create a smoother base.
Should I remove old tile before installing plank flooring?
Removal is smarter when the tile is loose, cracked from movement, uneven, damp, or already too high at nearby rooms. Keeping tile saves time only when the existing floor is stable enough to become part of the new flooring system.
What underlayment works best over tile?
The best underlayment is the one approved by the plank manufacturer. Some products come with attached backing and should not receive extra padding. Adding the wrong layer can make locking joints flex, separate, or feel spongy underfoot.
How do I fix uneven tile before laying vinyl planks?
Low spots and deep joints can be filled with floor patch or embossing leveler. High spots may need grinding if the tile surface is not flat enough. The goal is a smooth, consistent plane that supports every plank evenly.
Will installing planks over tile raise the floor too much?
It can. The added height may affect doors, appliances, stairs, cabinets, and room transitions. Measure the plank thickness, approved underlayment, and clearance points before installation so the finished floor does not create daily problems.
Can vinyl planks be installed over bathroom tile?
Bathroom tile can be covered when the floor is dry, stable, and free from hidden moisture damage. Areas around toilets, tubs, and vanities need close inspection. Any leaks or soft spots should be repaired before new flooring is installed.
What is the biggest mistake when covering tile with vinyl plank?
The biggest mistake is assuming hard tile equals a good base. Stability, flatness, moisture, grout depth, and height changes matter more than surface strength alone. Skipping those checks can lead to visible lines, separated seams, and trapped appliances.